I've been registered on RMWeb for some time but haven't really got on there much in the past. This evening I 'popped in' and stumbled over some really inspiring stuff.
First up, I found this picture of Andy Jones' 00 layout 'Summerborne' which I have to say has some of the most realistic looking model grass I have ever seen:
(more photos from the same thread here).
Andy has a really good photographic 'how to' showing how he achieved this effect using a combination of hanging basket liner, Woodland Scenics foliage, and static grass here, which I shall certainly be trying myself.
I spent a fascinating hour reading through the entire thread (all 17 pages of it!) seeing how the layout has evolved to this stage from fairly humble beginnings a year or so back.
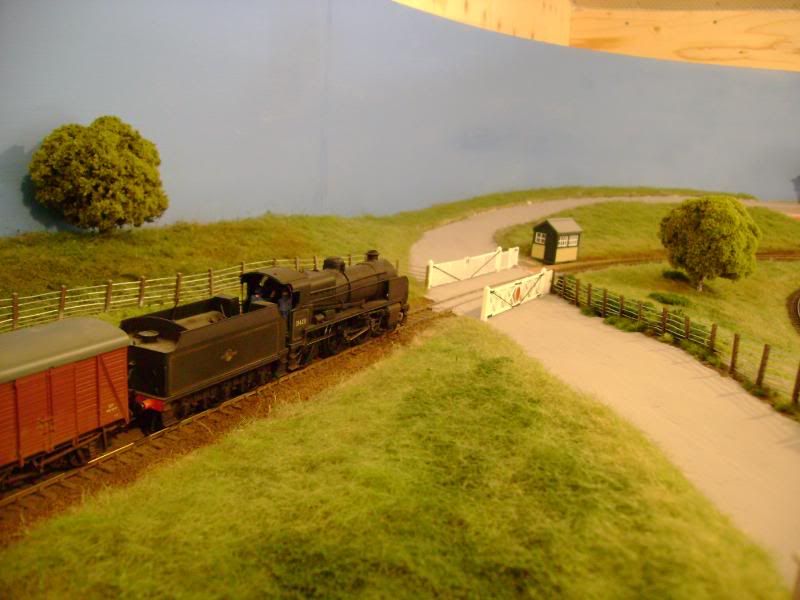
I also came across another layout thread, 'Sparky's EM gauge 'Penhydd'. I haven't read the full thread (18 pages) but looking at the earliest photos and comparing them with the most recent ones the transformation is again pretty dramatic. I love the effect he's acheived with the grass-grown trackwork here:
and here:
(See the rest of this post here and the full thread here.)
What really stands out for me, in the case of both these layouts, is that you don't have to get everything looking perfect immediately - in fact looking at the early photos of both layouts you might not think much would come of them, but with lots of work, general tweaking and incremental improvements over time, things can really come together to look the business. What's also evident is the way that, particularly with scenics, you can just keep adding to it, adjusting it, playing around with it until it looks right, much more so than is possible with other areas.
I shall be visiting RMWeb rather more frequently from now on I think!
Tuesday, 8 September 2009
Sunday, 6 September 2009
Switch blades
I had quite a productive modelling session yesterday afternoon - at least by my current standards -getting the remaining four switch blades filed up and ready for installation.
Filing switch blades isn't a particularly difficult or even time consuming task, but does require a bit of care. By the time I got to the fourth blade it took me about 10 minutes to make. The process is nothing revolutionary, but for those who are unfamiliar with it, here's what's involved:
First the rail is cut to length, allowing for a small (0.5mm - 1mm) insulation gap at the heel and for the toe to be flush with the leading edge of the first slide-chaired timber. Depending on the curvature of the turnout, one switch blade will be marginally longer than the other, so it's important to remember which blade you are working on.
After cleaning up the rail ends with a file, the rail is clamped to the right hand edge of an offcut of veneered chipboard, leaving a couple of inches of rail free to work on and with the end of the rail flush to the front end of the board. Using a small flat needle file, a taper about 25mm in length is filed into the head of the rail only (taking great care to avoid the base of the rail). The taper should just cut into the web of the rail at the extreme end.
Then, using a small pair of pliers, a very slight bend is made in the rail at the end of the taper, so that the tapered edge lines up with the straight edge of the rail - a bit of eyeballing down the length of the rail is called for.
The rail is then turned over and clamped down again but with the protruding flare of the rail base slotted into the groove so it lies flat. A full-width taper is then filed into this side of the rail, the length determined by the angle of the turnout (for a standard 'C' turnout this equates to around 33mm - at least for the GWR type I model). The rail should taper to a fine point a the end, with just the base on one side protruding.
Finally, the end of the blade is rounded off slightly at the top, and cleaned up ready for installation.
Subscribe to:
Posts (Atom)