Tuesday, 31 October 2006
More Martyn Welch inspiration
In the process of building up my back issues collection of 'Model Railway Journal' I have just stumbled across 'Monks Eleigh', another 7mm masterpiece by Martyn Welch, featured in issue 106. Granted, it's almost twice the scale of what I model in, but the level of realism and attention to detail really is second to none. I showed the pictures to Becky and her reaction was "It looks real!". Truly inspirational.
Wednesday, 25 October 2006
Scenery - experiments with colours
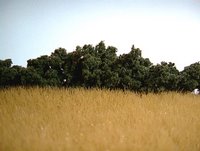
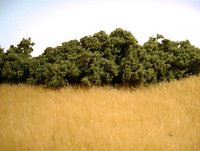
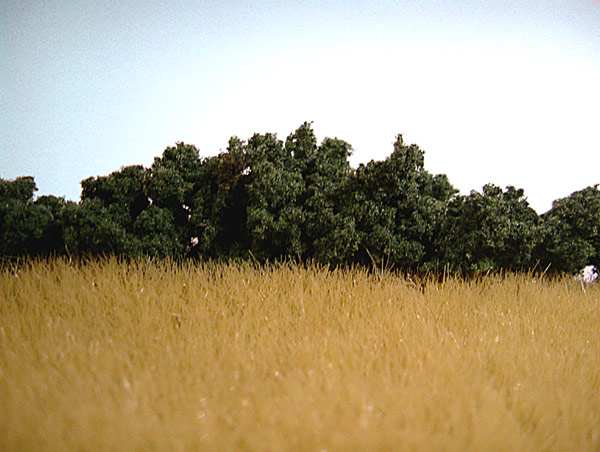
Here are a couple of quick mock-ups I put together and photographed just now using Gaugemaster (Noch) Beige Rough Grass and Woodland Scenics foliage. The foliage in the first photo is dark green, and in the second photo it's medium green.
The point of these photos is purely to compare the colours. What I'm looking to do is find the best combination of grass and foliage colours to represent late summer.
The medium green foliage seems to look better than the dark green - at least against this grass colour. Having said that, the grass might be almost too yellow - it could almost be a field of wheat. Ideally, there needs to be a little green showing through beneath the longer yellow-brown grass, but using the Guagemaster/Noch product means you're limiting yourself to an all-over single colour. Still, its not bad at all.
Sunday, 15 October 2006
Track photos
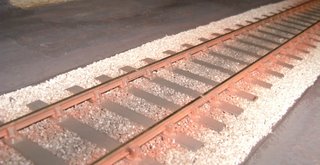
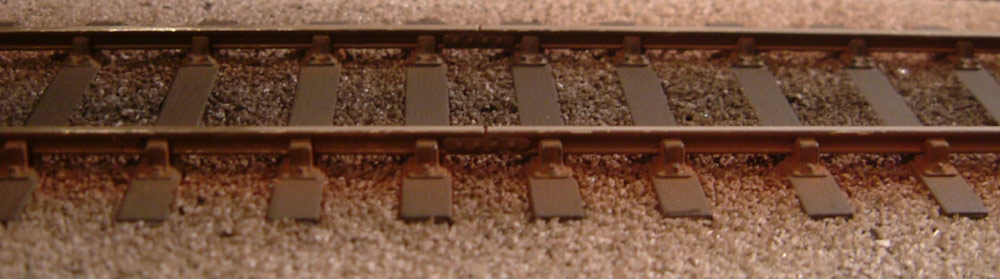
OK, enough talking. Here, finally, are some photos of my latest experiments in track painting, ballasting and weathering. I have to say that I'm pretty pleased with the result - especially the way it looks photographed (if you turn a blind eye for now to the blank canvas either side of the track that is!).
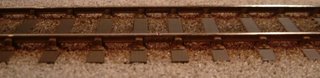
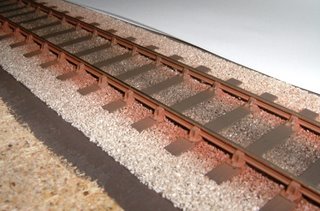
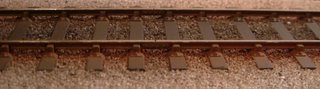
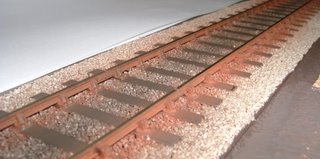

The process:
Take 1x 18" length of C&L '00' gauge flexitrack
Remove plastic webbing with a scalpel and widen sleepers to proper 4mm scale spacings (personally I prefer this despite the narrower gauge of 00 rails since at normal side-on viewing the gauge is less apparent anyway)
Glue to base. Leave to dry.
Create dummy rail joins at scale 60' intervals by cutting the head of the rails and super-glueing C&L etched brass fishplates to the rail sides. Ensure the 2 sleepers either side of the joins are spaced closer together.
Mix a sleeper colour using black, orange and light grey in ratio of approx. 1:3:1.
Paint sleepers and base. Leave to dry.
Mix rail/chair colour using black, orange and white in ratio approx. 1:5:3.
Paint rail sides and chairs. Leave to dry.
Using a small (1/8") flat brush liberally apply a 4:1 mix of PVA and water to the base between the sleepers, around 10 or 15 sleepers at a time, but making sure not to get the glue on the rails or tops of the sleepers.
While glue is still wet, sprinkle a generous portion of Woodland Scenics fine light grey ballast over the track until the sleepers are covered and rails almost buried.
Immediately shake or vaccum off the excess ballast, which can be resused.
Repeat until whole length of track is ballasted.
Leave to dry. Ensure freshly applied ballast is not disturbed until glue has dried completely.
Using a large (1/2") brush, brush off any loose ballast and vacuum entire trackbed.
Remove any paint from top surface of rails using a scalpel blade or abrasive, then polish with fibreglass pencil.
Weather the ballast using Carrs weathering powders rust and coal tones.
Sit back and admire!
I've spent a good few hours on this one 18" length of track and while I'm sure I will get quicker with experience (I found at each stage I got quicker as I went along) the biggest lesson I've learned so far is to take my time! Care and attention to detail at the painting and ballasting stages are essential to avoid a messy appearance. And as I've discovered, the key to using weathering powders is patience, building up the effect litte by little in almost imperceptible stages; a moment's haste or heavy-handedness spells disaster! (Thanks to Chris Baker, builder of 'Much Meddling' for valuable advice on this last point.)
Friday, 13 October 2006
Realism
November's edition of 'British Railway Modelling' came through the door yesterday, along with a supplement containing a selection of model photos by Tony Wright, BRM's photographer. It gives a fascinating glimpse into a whole host of layouts from 2mm to 7mm scale.
One of things I find myself doing, like it or not, when I see a photo of a model railway - and I find myself doing it with every new magazine that comes out - is to mentally 'mark' the photo based on how realistic it looks. In the past this was a fairly subconscious thing - some layouts I just felt had that 'something' and others didn't. And while that 'gut-feeling' is ultimately what its all about in this whole pursuit of realism, I'm beginning to make more of a point of trying to analyse why I feel this way - what is it about a model, or a particular photo, that conveys a sense of realism, or not? If the photo cries out 'model' as soon as you see it, what are the specific things that lead you to that conclusion? If I find myself looking twice to see if its real or a model, or if it just has that certain something that 'looks real' about it, then what is it that makes me feel that way?
Undoubtedly it's easier to identify the things that make something look un-realistic than the things that make something look realistic, but I think there's value in this. By identifying the culprits, I can hopefully avoid the same mistakes in my own modelling - easier said than done of course, but at least I know what to pay attention to, and what direction to aim at.
It seems often to be the same things that stand out in spoiling the effect on models - especially in close-up photography:
- Ballast that is too coarse
- Ballast that is laid too liberally, so the track appears half buried
- Lack of weathering, or an odd mixture of weathered and unweathered features/stock sitting side by side
- Unnatural colours - especially greenery
- Grass and foliage that doesn't really look like grass and foliage -wrong shapes, textures etc., grass too short where it would be long, etc.
- Buildings and structures that are not bedded down into their surroundings properly
- Over-detailed and unrealistic backscenes
- Over-scale details and features (even down to things like the relief on brickwork etc.)
- Overcrowding and over-compression of space - cramped, cluttered appearance
- Absense of the little details that bring a scene to life.
Wednesday, 11 October 2006
Scenery overload!
http://www.sceneryexpress.com/
Wow! I've been searching for online retailers that stock Heki, Noch and Silfor grass products having read a number of reviews (see here for example) and several model railway descriptions that mentioned one or other of these (Combwich, Engine Wood, Much Meddling). Until now I was struggling to find anywhere that sold more than one or two of these products online.
There are more scenic products here than I thought existed! OK, so some of them are a bit tacky to say the last, but some of them look truly speactacular (used in the right hands of course...!).
Not sure what the postage would be like from the USA??
Subscribe to:
Posts (Atom)