Thursday, 30 March 2006

Last night I printed out the track plan at full size to lay out on the basebaords. It's amazing what a difference this makes in seeing how the design works and whether there are any areas that could be improved.

Already I have seen a few potential changes that could be made.

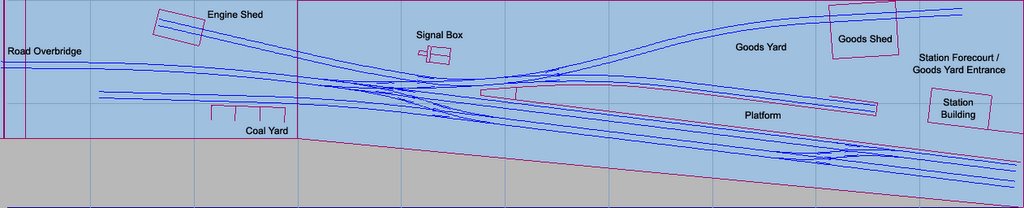
  1. I think it will be possible to eliminate the 3-way turnout at the entrance to the station (which is good because I dread the prospect of having to build it!) by splitting it into two standard turnouts - a LH B6 into the bay platform and goods yard (pushed as far up against the baseboard join as possible while still allowing room for the point motor underneath) followed by an A5 RH into the loop. Measuring this out, there would actually only be about a 5cm reduction in the length of clear road on the main platform between the two loop turnouts, a small price to pay for a lot less hassle.
  2. While I have yet to find a suitable prototype to base it on, I think that if the goods shed can be kept reasonably small, there would be room for an additional siding in the goods yard adjacent to the bay platform and of a similar length, which would add significantly to the operating potential. My one concern is that things don't start to look too cluttered - with just the one siding there is quite a spacious look which I have to say I do like. However, examining photos of Combwich (still a signifcant source of inspiration), the goods yard is quite cramped widthways but still looks ok.
  3. I'm undecided about the coal siding. While it definitely adds operating potential, and I do think coal facilities are a necessary part of a branch line terminus, I just wonder if having it here works. I do want to retain at least some illusion of the railway in the landscape as opposed to simply covering every available space with track and railway related cameos. The alternative is to have the coal stacks situated in the goods yard itself, as on Combwich - which saves space but I'm not sure quite how realistic this is. Ideally, different types of goods traffic should have seperate sidings, otherwise you run into problems with coal wagons obstructing access to the goods shed etc. I need to look into prototypical goods yard operations a bit more to find out what is feasible, and also think about what works from an operating perspective. What might work in a prototypical situation with a twice weekly pick-up goods is not really so attractive for a model where I might want to run several goods trains per day (whatever a 'day' in model operating terms is!).
Anyway, enough already!

Tuesday, 28 March 2006

New track plan

Three or four months have passed now since I first decided I was going to build a model railway. The baseboards have been sitting there for three months, and the track plan has, by and large been fixed for most of that time too.

So you would think I might be getting a little impatient. Well, maybe sometimes! But in fact I'm realising that it's actually quite a good thing to take the time to 'live with' a plan first before launching out into building it. Novelists often map out an entire book, fleshing out people, places and events as fully as possible in their mind before even putting pen to paper - the more thoroughly this has been done the more convincing the finished article. The same goes for films, paintings, music... pretty much anything creative.

So it's little wonder then that when it comes to building a model railway, spending time planning - not just drawing a track plan but thinking through the details that will fit together to make up the final illusion of reality - is so important.

Of course, the track plan is central to the whole process if you're building a model railway - it is after all the main subject of what we're creating. Templot is proving a really invaluable tool in this area (although I still think it could be made a lot simpler to use!). Paper templates or pencil drawings, no matter how carefully laid out, just don't give the same level of accuracy.

Anyway, on to the point of this post. Having lived with my track plan for several months, I finally ran into a problem that I hadn't previously considered which proved unworkable. I had been intending to have a goods shed on the siding closest to the station, with a coal yard on the rear siding. The problem was that there simply wasn't going to be room to fit both of these side by side with the station at the front of the layout.

So I started to play with some different ideas - basically, switching the station itself around so that the main platform along with the station building is facing the front of the layout, then having the goods yard behind the station, and moving the coal yard to a seperate location at the front of the second baseboard. Click on the picture below to open a larger version:


I think this improves on the earlier plan in several ways. Obviously it frees up a good deal more space for the goods shed, and even though the station goods yard is reduced to a single siding, the area available is quite a bit bigger both width and lengthwise, therefore creating more sense of space (rather than risking looking cramped). I think this feeling of space is very important - trying to cram too much into a small space is one of the biggest detractors from realism in many model railways, I think.

Secondly, I think it is probably more realistic that the goods yard is located behind the station rather than in front of it. Road access is more convenient, and from a railway planner's point of view at least, waiting passengers don't really want to be looking out over a grimy goods yard while they wait for their train.

Originally I had quite liked the idea of 'viewing' the trains from behind the platform - in fact this had really been the initial spark of an idea that I'd based the rest of the design around. But the drawback of this configuration, on reflection, was that the station buildings would be facing towards the back of the layout - meaning that some of the more interesting detail of the station itself would be hidden to the viewer. Turning the station around overcomes this problem.

I did consider sticking at just the one goods siding, but decided that this would really place too much of a limitation on the (already limited) operating potential. In fact, having the coal siding in it's new location, seperate from the goods yard will probably increase the operating potential from how it would have been previously. I think it was also not uncommon for coal yards to be seperate or at least slightly removed from the main goods facilities. (The ideal location would be a long siding set back some way behind the goods yard, but obviously this is not an option here.)

I also considered ditching the bay platform and having this as a second goods siding - after all, a small branch line terminus like this may not really require two platforms. On the other hand, I quite like having this extra option.

Anyway, I need to allow a bit of time to get used to the new design and think it through in a bit more detail before committing to it completely.

Friday, 24 March 2006

Brake van progress

Progress on the layout is painfully slow. Part of this is down to waiting for sufficient funds to finance purchasing all the kit for building the track. Meanwhile, since (just about) finalising my track plan in Templot a few weeks ago, I've not done a lot.

Last week I bought a Parkside Dundas SR utitlity van kit which I managed to build fairly easily and succesfully... until I realised that I'd failed to take into account the distance between the axle bearings on the sideframes - the kit is built to take 00, EM or P4 wheels, and so there is a bit of 'play' to be had with the spacings of the sideframes. It would have been realtively easy to fix with some thin plasticard but I'd already glued into place the brass bearings. The upshot being that I've had to buy a second kit to have another attempt. Oh well, you live and learn!

Having not yet started the second kit, the last couple of evenings I've returned to my brake van 'project' as I felt it was time to crack on with it really. The photo above shows the latest progress with the addition of 3-link couplings (Smiths) and Gibson wheels (which I painted and weathered prior to fitting), and wire handrails - on one side so far. Underframe detailing including brake shoes (the original moulded ones were not even nearly in line with the wheels), and footboards have yet to be added. I removed the vacuum brake cylinder and V-hangers which I'd previously fitted as I've learned that these were hardly ever fitted on the prototype.

The handrails are not as difficult to make and fit as I thought they would be: fine brass wire, bent to shape using a pair of needle-nosed pliers, then super-glued into pre-drilled holes. The trickiest bit was glueing the long horizontal handrail between the two inner vertical rails - fairly fiddly, and I have yet to discover how strong!! I have some reservations about how easy it will be to paint the handrails once the body is painted without white paint running everywhere but I'll cross that bridge when I come to it. Ideally I'd like to paint the body with an airbrush which means it could be quite a while before that happens (more funds required, and currently less of a priority than a lot of other things!!).

Sunday, 12 March 2006

A milestone!

Tonight I feel like I can truly say I have at last entered the world of 'finescale' modelling... I have built my first piece of track! Now I know to any modellers out there who have been building track for any length of time this may seem a trivial and unremarkable thing, to me it is something of a milestone. For years I have been somewhat in awe of anyone who builds their own track, as if somehow building track were in a league way beyond constructing your own scenery or buildings.

Well, for anyone who is still under that illusion I'd like to report that it's no big deal. Yes, patience is required, and a steady hand, and a fair amount of time. But if you know what to do it's well within any modeller's grasp.

Any thereby hangs the biggest hurdle of all... knowing what to do. It's taken me a good couple of months of 'research' to get to the point where I felt I had enough knowledge to tackle the job, and there seems to be a real lack of straightforward, readily available information out there.

So for those who are struggling to know where to start, here is my rough guide:
  • Buy Iain Rice's book 'An Approach To Building Fnescale Track In 4mm' (published by Wild Swan and available online from Kevin Robertson Books) if for no other reason than to get some information about prototype track. Whether or not you follow his methods for track building is up to you.
  • Buy a turnout kit from C&L (available online either direct from C&L or from Mainly Trains)
  • You'll need a bottle of Butanone (Daywat) liquid polystyrene cement (also available from the above sources online and any decent model shop) - normal polystyrene cement will not work on ABS moulded plastic. This is applied with a small brush (a Humbrol '0' is ideal). The sleepers can be glued down using PVA although I decided to use Evo-stick impact adhesive as there's less chance of sleepers coming loose during construction.
  • Also you will need a sharp scalpel, a small file (I discovered that the pre-milled switch blades in the kit equired a little extra work), a pair of tweezers for picking up, positioning and adjusting chairs and fishplates etc., some side-cutters for cutting rail to the correct length (I'm not sure you need an expensive set of Xuron track cutters although my cheap side-cutters may not last long!), and a small pair of pliers for creating the flares in the check rails.
Then I suggest you just crack on with it!

Here's the finished result:


After completing the turnout (all bar soldering of tie bars and wiring), I ran some stock through it and realised that the wing rail on the straight side of the crossing is slightly misaligned causing the wheels of my Bachmann Mk 1's to jump 'out' of the track. Repositioning the check rail so that there was a wider check rail clearance has solved this - not ideal but apart from taking the crossing apart and resoldering it all it's the only option really. (I'm not sure if this is an incentive to build my own crossings or whether the chances of me messing it up are greater than the chances of buying more dodgy ready-built crossings! I did also have to do some additional filing to one of the switch blades to get a good close fit against the stock rail although that's not a major job).

Well, there we are. Finally, here's a photo of one of my recently aquired Airfix ex-LMS suburban coaches sitting on the newly built track:

Monday, 6 March 2006

Templot track plan


Here's a screenshot (actually several screenshots joined together) showing the track plan I've produced in Templot. (You can click on the image to view a larger version).

The track plan itself is at full (model) scale. The real advantage of using Templot is that I can work close up on individual track components such as turnout timbering, crossings, etc, and then zoom out to see it in the context of the complete layout. It also means I don't have to rely on guesswork at the construction stage.

The plan is to permanently stick down a full sized set of templates onto the baseboards as a guide for subsequent building. I'll then print out smaller sections a bit at a time as templates for building the various track formations away from the baseboards. The finished pieces can then be transferred to the layout and the templates lined up. That's the plan anyway!

I've cheated slightly, for the time being anyway, with the 'Y' turnout at the entrance to the shed road, by simply overlaying two standard, opposite handed turnouts and leaving the centre road visible.

Saturday, 4 March 2006

Track construction

Following on from my last post, I've found a few answers to my questions regarding constructing the track away from the layout.

From various responses to a posting I put on the newsgroup, it seems that the recommended method is to temporarily sellotape the paper templates to a flat surface (a piece of chipboard left over from my butchering of the bookshelves should do fine!), build the track on this, then when complete, carry the entire formation (plus temporary wooden base) to the layout baseboard, lift (or slide) templates+track into place and install.

This sounds ok. I'm not sure about fitting wire droppers to tiebars for point motors to attach to - where would these go during construction? But I'll cross that bridge when I come to it.

I haven't actually bought the track components yet, but I have been refining my templating skills in Templot - I've finally begun to get the hang of using it. It's still fairly slow work, but then I suppose designing something of this complexity is never going to be just a case of a couple of clicks!

To begin with I was just creating individual turnout templates. But now I've begun to put it all together into one big layout design. the advantage of this is that I can see exactly where everything will go and how it will fit into the space whereas up until now I've been using a fair bit of guesswork and approximation. One thing I have noticed is that using scale turnouts increases the length of any track formations at least slightly from what I was working to before. This is not a problem though as there is still adequate space for what I want.

I've reduced the number of 'Y' turnouts to 1 now - the tournout in the goods yard was going to be a 'Y' but working in Templot, I found that a standard LH turnout is better, moving the goods shed road a little further from the platform loop which I think will give the illusion of space more than if I had three tracks running parallel to each other. The only thing to watch out for is to make sure theere is adequate space between the two goods yard sidings.